Hoyme-HAE-installation-instructions-commercial.pdf
HAE – Product Information Page
Installation Instructions for HMI Hoyme Motorized Commercial Air Exchanger (HAE) – HAE-1000-500 Model
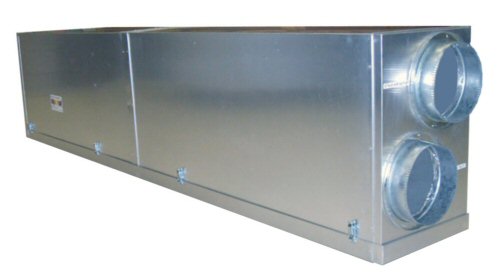

Interior view (Bottom)
This Installation Shall be Subject to the Approval of the Enforcing Authorities
Specifications:
- The commercial ‘HAE-1000-500’ is 14″x 23″x 100″
Shipping Weight:
- 500 Model ~80lbs.
Comes with:
- ½” Plastic Drain Hose (#9)(15′)
- 24″ Mounting Brackets (#10)(x4)
- Installer is to supply 8″Ø ducting, two all-weather hoods, manual balancing damper and other necessary connectors for intake and exhaust
- Fans may also be necessary if not connecting to a forced air heating system. Motorized Dampers are optional but recommended.
- Other recommended items are listed below
Hoyme-HAE-exchangers-checklist.pdf
Installation Instructions
Read Complete Instructions before Starting the Installation of this Product
- Air supply and installation shall be in accordance with National Building Codes and/or Local Codes
- Designed to be inter-connected to forced air heating system or motorized fans
- Motorized dampers are recommended but not required
- Select location for the HAE, preferably close to outside wall. Location must allow for bottom cover to be removed for cleaning
- Mount the HAE securely using screws and four metal brackets supplied
- Cut 8″Ø openings in outside wall for the air intake and exhaust
- Insert 8″Ø All-Weather Hoods from the outside and fasten into place with proper screws.
- Fasten 8″Ø Insulated Flex Ducting to the 8″Ø sleeve of the All Weather Hood. Fasten 8″Ø sleeve with a sheet metal screw. stretch the 8″Ø Flex Ducting to reach the HAE and cut to length
- Repeat this same process for each of the outside ducts
- Attach insulated ductwork from the Outside Hoods to the ducts on the HAE clearly labelled
- Attach Un-Insulated Ductwork from the inside the building to the ducts on the HAE clearly labelled
- When not connected to a forced air heating system using Inline Fans and Motorized Dampers is recommended
- When using the inline fan and motorized damper system, attach the motorized damper closest to the “Fresh Air to Building” duct, then the inline fan as seen in the photo below
- On the “Exhaust Air From Building” duct attach the inline fan closest to the air exchanger and then the motorized damper. Connect ½” Drain Hose. To provide proper drainage, level of hose must always be lower than the Bottom of the HAE. To assist water drainage, mount HAE level with ½” drain spout situated at the warm (building) end of the HAE
NOTE: Heat during the firing cycle usually melts the ice formed and is drained off through a ½” plastic hose.
NOTE: Fasten all Ducting in a Neat and Tidy Manner, free from punctures, excessive heat and wear. Carefully tape all ends. Support Flex Ducting as level as possible to prevent water pockets forming during Defrosting Mode
Hoyme-HAE-installation-instructions-commercial.pdf
HAE – Product Information Page
Hoyme-HAE-installation-instructions-residential.pdf